
How To Make Your Own Probiotics
Probiotics are a type of good bacteria that are only found in a handful of foods. They are known for their ability to improve and maintain a healthy gut. However, the health benefits and medicinal properties are numerous and will do more than just keep your microbiome healthy.
The most common foods that contain probiotics are:
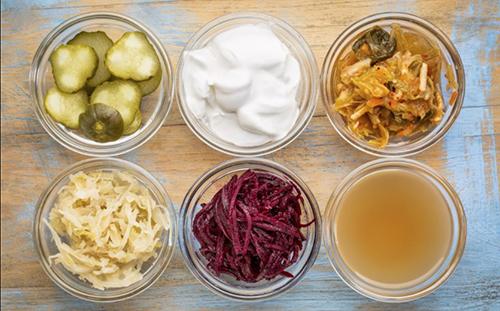
- Sauerkraut
- Yogurt
- Beetroot
- Kimchi
- Miso
- Fermented drinks (e.g. Tepache, Kombucha, Kvass)

While you can purchase most of these in your local supermarket, it’s both fun and rewarding to make your own probiotics at home. Making your own also allows you to adjust the recipe to your liking, according to your taste.
Probiotic drinks are a good place to start if you’re new to this. Many of them use fruit as their yeast source, meaning you don’t need to purchase hard-to-find ingredients.
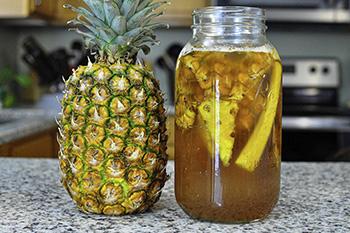
How To Make Medicinal Tepache At Home
I’m going to show you just how easy it is to make Tepache at home. Tepache is a Mexican drink and is pronounced ‘te-par-chey’. This incredible drink is not only full of probiotics but also prebiotics and antioxidants. The added cinnamon and ginger are also anti-inflammatory, making this drink particularly beneficial for your health.
Medicinal Benefits of Tepache
 Supports digestive health because it’s a source of good gut bacteria, which aids your body to absorb nutrients
- Can help with inflammatory bowel diseases, e.g. Crohn’s Disease
- Can help relieve Irritable Bowel Syndrome symptoms
- It’s hydrating, which helps keep your joints lubricated, your organs in good condition and boosts cognition
- Contains a lot of Bromelain, an enzyme that fights cancer cells
- It’s rich in vitamins and minerals, including Manganese, and Vitamins B & C
- It’s a natural diuretic, which helps rid your body of sodium, in turn reducing blood pressure
There are a whole host of other medical conditions, which many claim probiotics can help, including asthma, eczema, urinary tract infections, and rheumatoid arthritis. However, there haven’t been large enough studies undertaken as yet to verify the positive links between probiotics and these medical conditions. Nevertheless, probiotics are an important part of our diet and new benefits keep appearing all the time.
Probiotics are generally recommended for the majority of the population, with a few exceptions: people with a compromised immune system or those who are critically ill.
Recipe
This Tepache recipe is surprisingly easy to make and tastes great. It’s also quick in comparison to most probiotic drink recipes. It’s a great recipe to start with if you’re new to making probiotics at home.
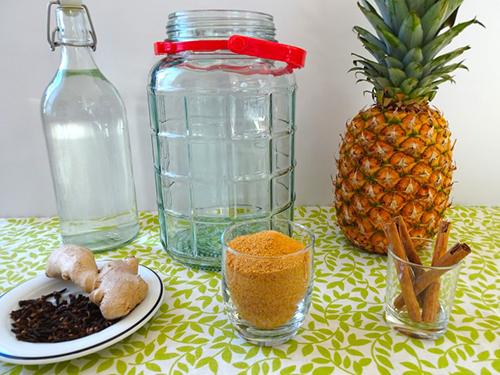
Ingredients
- 1 ripe pineapple
- 1 cup of unrefined cane sugar
- 2 quarts / 8 cups of water
- 5 inches of ginger
- 2 cinnamon sticks
- 3 cloves
Note: You can make Tepache using just the first three ingredients on the list. Hence, if you are not a fan of ginger, cloves, or cinnamon, leave them out. Conversely, if you love any of these, feel free to add more in.
Equipment
You’ll need the following essential equipment to make this Tepache recipe:
- Large glass container – the jar that I used can hold 1 gallon / 4 liters. If you have a smaller container, just halve the recipe. If you continue making probiotic drinks, you’ll probably want to invest in a larger container at some stage because of the long fermentation time. That way you can make big batches and keep the finished product in the fridge. It’s important you use glass because other materials can interfere with the fermentation process.
- Serving bottles – these are really useful if you plan on continuing to make your own probiotic drinks. You can also use any glass jars you have lying around or water jugs. Just remember to seal any finished probiotic drink before storing it in the fridge.
- Sharp knife – for cutting the pineapple peel away and ginger skin.
- Tea towel or cheesecloth – for covering the glass container while the Tepache cultures.
- Grater – for grating the ginger.
Optional equipment, when it comes time to strain your Tepache mixture:
- Fine sieve – a fine mesh strainer is perfect. You can also use cheesecloth.
- Large salad/serving bowl – a handy tool for pouring your mixture into before transferring it to your serving bottles.
- Funnel – this is to pour the finished Tepache into narrow-necked serving bottles. If you use a water jug or carafe you can skip this.
- Ladle – can be useful for transferring the mixture slowly into your serving bottle via the funnel.
Instructions
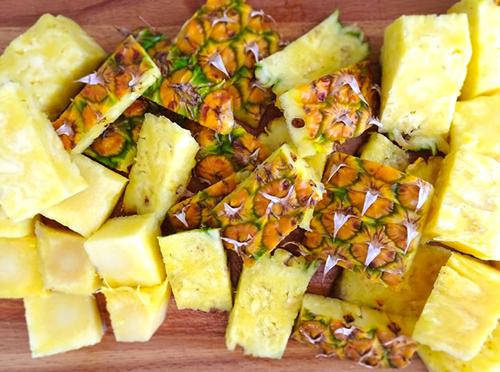
1. Prepare your pineapple – using a sharp knife, cut off both ends of your pineapple and discard these. Rinse the body of the pineapple under running water for one minute, while rubbing the peel with your hands. Cut the peel off and then cut it into smaller squares. Cut the core away from the flesh too and chop it into cubes. Set this aside, it will be the basis for your Tepache.
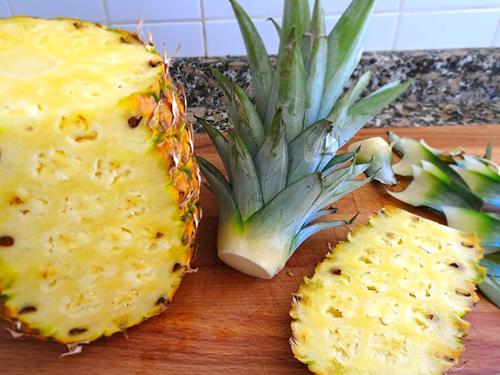
Note: You only need to use the peel. If you want a stronger flavor or don’t think you can eat all the flesh before it spoils, you can also cut this into cubes and include it. Traditionally, Tepache was made using just the peel and the health benefits will still be the same.
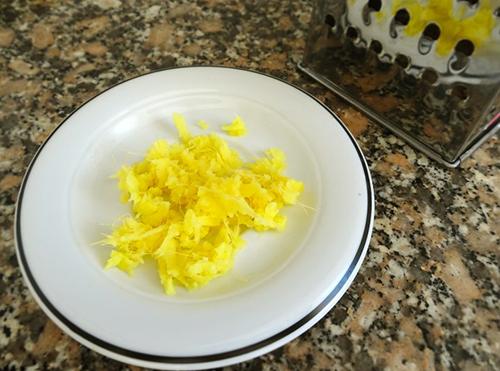
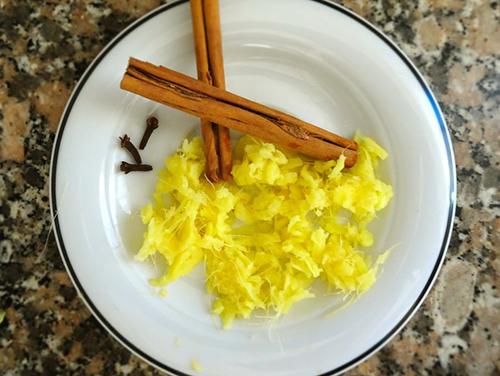
2. Ginger & spices – grate 1.5 inches (4cm) of ginger (you should have a heaped tablespoon once done). You don’t need to mince it; use the largest holes on your grater. Get out two cinnamon sticks and three cloves and place these with the ginger.
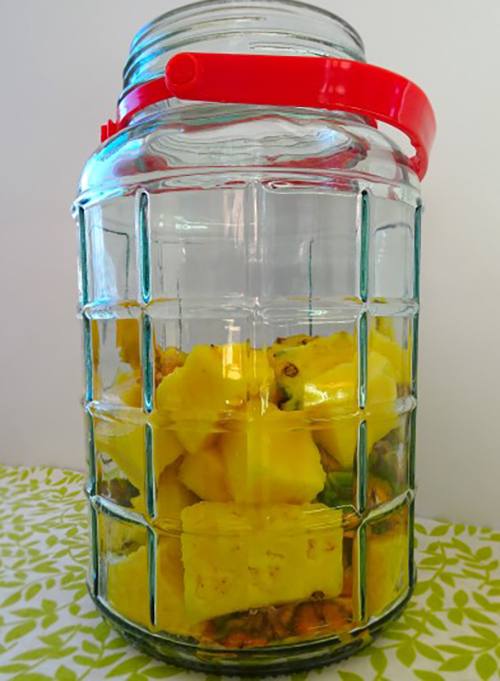
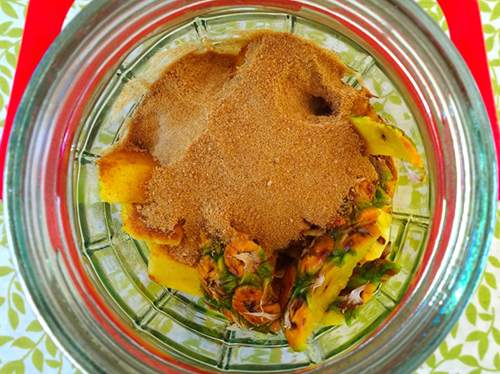
3. Add the first ingredients – add the ginger, cinnamon, and cloves to your glass jar first, so the pineapple helps weigh them down once you add the water. Next, add the pineapple chunks. Your jar will start to get heavy after this step so it’s a good idea to add your ingredients to the jar in the location where you want to store it. It will need to be kept at room temperature and somewhere away from direct sunlight.
4. Sugar – add 1 cup of unrefined cane sugar (you may know it as Panela, Piloncillo, Panocha, or Rapadura). If you can’t get hold of unrefined cane sugar, you can use brown sugar, or white sugar at a pinch.
5. Water – add 2 quarts (8 cups) of water.
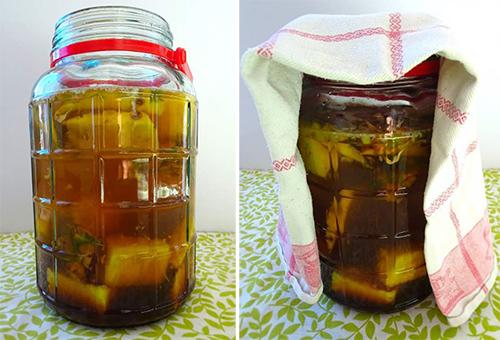
6. Cover – cover the glass container with a tea towel folded over twice or with cheesecloth. You can also use plastic wrap that is very loosely draped over. If you live in an area with lots of bugs and flying insects, it’s best to use a tea towel or cheesecloth and place an elastic band over the lid to seal it close.
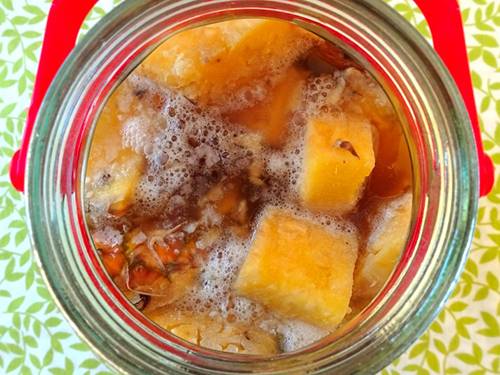
7. Ferment – let it sit for 1-3 days, depending on your flavor preference (one day will produce the mildest strength and three the strongest). You should see a light layer of white froth at the top of the jar somewhere between 24 and 36 hours into the process. You can scoop this out with a wooden spoon, or mix it back into the mixture. It’s not harmful.
The longer you let it sit and culture, the more sour, fizzy, and alcoholic it will become. However, it will still have a low alcohol content if you don’t let it ferment for more than three days. I recommend you test your mixture after 24 hours and then every 12 hours. If you live in a hot climate, the process will be even faster so check it regularly.
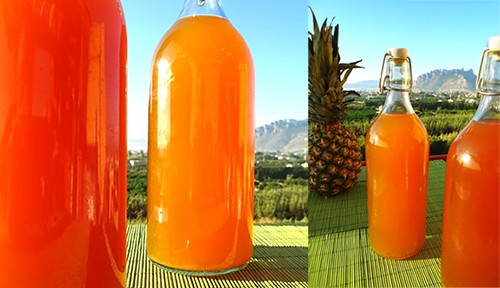
8. Strain – When you’re ready to strain your Tepache, use whatever method you prefer. I find that it’s easiest to strain it through a sieve into a large salad or mixing bowl. Then, I take a ladle and pour it through a funnel into my servings bottles. Like I mentioned earlier, if you are going to use a water jug with a big opening, you can skip the funnel step and pour or scoop it straight in.
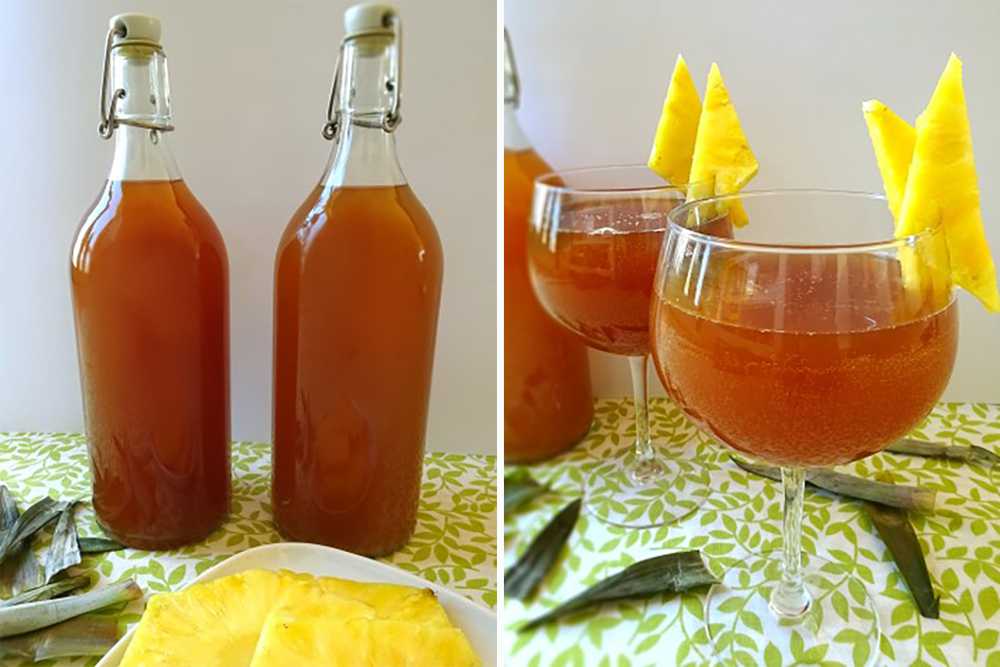
You can drink some straight away but it’s best chilled, so pour it over ice. Otherwise, place a lid on it and store it in the fridge to enjoy it in your own time.
Tip: You can use the pineapple peel again because it will still have enough yeast for another batch.
You may also like:
 10 Easy Ways to Improve Your Gut Health
DIY Colon Detox with Ingredients You Have in Your Kitchen Right Now
How to Make Medicinal Kombucha at Home
50 Amazing Uses For Honey You Didn’t Know About
If you liked our article don’t forget to pin it!


I am Keto, can I use Monk Fruit to substitute the sugar?
We drank homemade kombucha when we were on keto. The real sugar is required to feed the yeast. Most likely if you let it sit for more than 3 days the yeast will eat most of the sugar and deposit the probiotic in it’s place. The remaining sugar can be ok and will not kick you out of ketosis unless your consuming more than 20 grams of sugar per day.
The sugar is necessary for the fermentation and the yeast eats it up so if is safe.
Tepache + a cup of Sugar! That’s inflammatory.
I believe the sugar isn’t for taste., The 1 cup of sugar is part where f the fermantation process.
I don’t know much of this particular process but I know with Kombucha that’s the reason for sugar.
Here is the thing Kombucha e totally forbidden if you want to lose weight because it feeds candida e I can tell you that my insulin would not go back to normal until I removed the “drinking kombucha” habit..if it is still sweet, it means the bacterias did not eat the sugar..at least not enough to be safe to keep candida in balance in your body
I was going to comment on the same thing! Sugar is an inflammatory ingredient. Is the natural pineapple sugar enough to ferment the drink? I need to skip the sugar all together. Thanks!
Hi Julie,
Adding sugar as in tepache is not always needed but generally preferably because increases the fermentation rate. You need enough of the skins if you want natural yeasts/bacteria, or you can add brewers yeast.
God bless!
I don’t think raw unrefined cane sugar or honey is inflammatory but you can also get fresh squeezed cane juice. Also the natural sugar from the pineapple should be good but the fermentation might take a lot longer with out the sugar. You might want to research that more.
The sugar is eaten by the yeast
How would honey be in place of the sugar? Do you need sugar for the fermentation?
Sugar is to Jumpstart the yeast before any bad bacteria can get a foot hold. Honey may work because yeasts can consume it but it may kill beneficial bacteria if they are present. I don’t know.
Adding sugar to this is not a smart idea. At all.
Hi Audy,
In this recipe, the sugar used is Piloncillo: a pure natural cane sugar concentrated by boiling. There are no additives, in addition to being a food source as rich as honey. Piloncillo has been discovered to have some unique medicinal properties. It has the reputation of being a medicinal sugar and is prescribed for use in the Ayurvedic system of medicine.
God bless!
I loved this version of tepache, I’m Mexican and I usually use “piloncillo” which is unfiltered and unrefined cane sugar loaded with minerals and other good stuff. Thank you for the recipe
I usually use “piloncillo” which is unrefined and unfiltered cane sugar loaded with minerals and other good stuff, instead of sugar. Thanks for the recipe.
Hi Gladis,
Thank you so much for your comment.
That is a very good choice.
The author also used cane sugar.
At step “4. Sugar – add 1 cup of unrefined cane sugar (you may know it as Panela, Piloncillo, Panocha, or Rapadura). ”
God bless!
The sugar is necessary for the fermentation process and us eaten up during the fermentation process.
I am curious about the sugar too. Much as I love it, I’m pre-diabetic and trying to change my diagnosis. Thanks!
the sugar is eaten by the yeast
The sugar is needed for the yeast to eat to cause the frementation process. In the end there is no sugar left —-piloncillo is a type of sugar. Do not use honey as it inhibits the fermentation process. Best to do some due diligence and read about fermentation and educate yourselves to what is occurring.
I understand that yeast needs sugar in order to grow and ferment, but the TYPE of sugar used is the variable. Brown sugar is not much better than refined white – both have a high glycemic index. “Unrefined” is better but still not as natural as fruit etc. Honey might, in fact, kill the good flora since it is such a great antibacterial etc. Perhaps maple sugar, coconut sugar or agave?
Yes, what about coconut sugar? I’d like to use that, if possible.
Hi Julie,
Thank you for your comment.
Besides tasting nice, coconut sugar also is considered to be a healthier alternative to white refined sugar, However, brews made with coconut palm sugar often take longer to ferment. This is not a bad thing, as long as the fermentation process is not overly slowed down.
So you can definitely use a healthier substitute for normal sugar.
God bless!
my personal choice is coconut sugar
Hi Mary,
Great choice 🙂
God bless!
Could you use sucanat for your sugar
Hi Mark,
Yes, Sucanat can be used as well.
God bless!
Can black strap molasses be used as the sugar? I live on Crete,Greece and it’s hard to find many items.
Hi Elizabeth,
As with sugar, there are different levels of refinement when it comes to molasses. Which type of molasses you are going to be using for brewing will influence the quantity required. In this case, you will have to use more molasses per batch than sugar.
Molasses has a strong and bitter taste which will come through in your brew even once fully fermented. The flavor can be nice, delicious, but also overpowering if you are not wild about the taste of molasses.
God bless!
Can I use black strap molasses as sugar?
Can you say a bit more about storing this drink? How long can I expect it to last? Can I keep it out of the fridge (for example during travel), will it ferment further if it’s not in the fridge, although it’s already been strained?
Hi Ina,
Thank you for your comment.
For storing it, you can keep it up to 2-3 months in the fridge. If it’s in a sealed container you should release it – ‘burp it’ – every so often because of the carbonation and you don’t want too much pressure building up. Even in the fridge, the mixture will continue fermenting but very slowly.
Regarding the travel, it would be fine to leave it out of the fridge for a few hours while traveling, but you want to drink it cold so would need to keep it in a thermos if you plan on drinking it whilst on the move, or add ice when you get to your the destination. I wouldn’t leave it out for long though because it will change the flavor and alcohol content, plus increase the risk of the lid exploding.
God bless!
Room temperature for me is 55 degrees on average. Yes, I know but it is! Am I still able to get this to ferment?
What if it is winter and pineapples are hard to find in the grocery stores? Is there a substitute fruit rind that I can use to make this recipe now?
Hi Joe,
You can ferment all manner of fruit. The process is essentially the same. It all depends on the balance of flavor, sugars, and time the ferment of various fruits will require.
However, the classic “Tepache” recipe is made with pineapple.
You can have a look at our medicinal kombucha recipe:
https://thelostherbs.com/how-to-make-medicinal-kombucha-at-home/
God bless!
Thank you for your answer. So I made up two batches and I am wondering how you can tell if it is “done”. It has been cold here so have not seen a lot of bubbling action. After two days, I tasted it and it was flat and not sour at all. Should I let it go longer? Should I agitate it? Also, I have seen some white mold growing on the rind pieces that are sticking out of the solution. Is this OK or is the batch ruined?
Can you drink this if you have Candida over growth?
Hi Lisa,
Yes, you can drink it.
In fact, probiotics can help with Candida in various ways.
God bless!
How do you know if it is ready? I have not had alot of bubbling action. It has been 3 days and it does not taste sour or have the CO2 fizz at all. It has been really cold so does that add alot to the fermenting time? Also, is it OK for some mold on some of the pineapple pieces that are sitting outside of the solution?
Hi Joe,
Usually, a little bit of mold should be ok. Just scoop it out.
However, since there is no bubbling action so far, I would say to start a new batch.
Please keep me updated with your progress.
God bless!
Can I use date sugar??
Hi Mary,
The best sugars for fermentation include corn sugar (dextrose), table or cane sugar (sucrose), and raw sugar.
Date sugar is indeed healthier and it can be used as well, however, brews can take longer to ferment. This is not a bad thing, as long as the fermentation process is not overly slowed down.
God bless!
Can I make this with coconut water?
Hi Deanne,
The Tepache original recipe is with water. But you can use a combination of water and coconut water if you want.
God bless!
I’m curious how to know what strains of probiotics it makes. I’m looking to make particular strains of probiotics, especially Lactobacillus plantarum PS 128. Are you able to guide me at all? Thank you! This is very interesting and I’m definitely going to try it!
How long does this probiotic drink last for in the fridge?
what is the recommended dosage?…8oz/day?…..4oz./day?
Hi,
Thank you so much for your comment.
You can drink 1-2 glasses daily.
We wish you the best of health!
Im so excited to taste this! Ive heard you can use the core and peel of the pineapple for medicine and have been dragging my feet but I finally did it! I feel so silly I waited this long because it was so easy! Thank you for this awesome info, there are still so many discoveries (rediscoveries) from the old days that Ive yet to find. The missing pieces our bodies need!
When making a 2nd batch with the same peel, do I still need the same amount of ingredients? Like the sugar? Can I reuse the cinnamon sticks also? Feel silly asking. Ty for your time and these recipes!!
How long does it stay good? 1 week? 4 weeks? Thank you